With the launch Windows 10, Microsoft introduced the application Photos for viewing, editing and sharing photos. application Windows Photo Viewer it was "hidden" from Windows 10, but fortunately, in this tutorial you will learn how to activate Windows Photo Viewer in Windows 11. The old application through which you can quickly open photos in the format JPEG, BMP, PNG, GIF si TIFF.
If you are not familiar with this application, find out Windows Photo Viewer is an image viewing program included in operating systems Windows, starting with Windows XP and up to Windows 7. The application remained on Windows 10 si Windows 11, but so that users can open and edit photos with Windows Photo Viewer, there is no need for a change in the registers Windows (Windows Registry).
In the latest versions of Windows, Microsoft began to replace Windows Photo Viewer with the new application called "Photos". An application that, in the opinion of many users, is less friendly and consumes more resources CPU and RAM.
Content
What can you do with Windows Photo Viewer?
This program is used to view images and photos on your computer. Windows Photo Viewer offers a range of simple functions, including resizing, rotating and zooming images. The program can be set as the default image viewer, which means that when you double-click an image, it will automatically open with Windows Photo Viewer, but, as I said above, after you make a change in the registers Windows 10 or Windows 11.
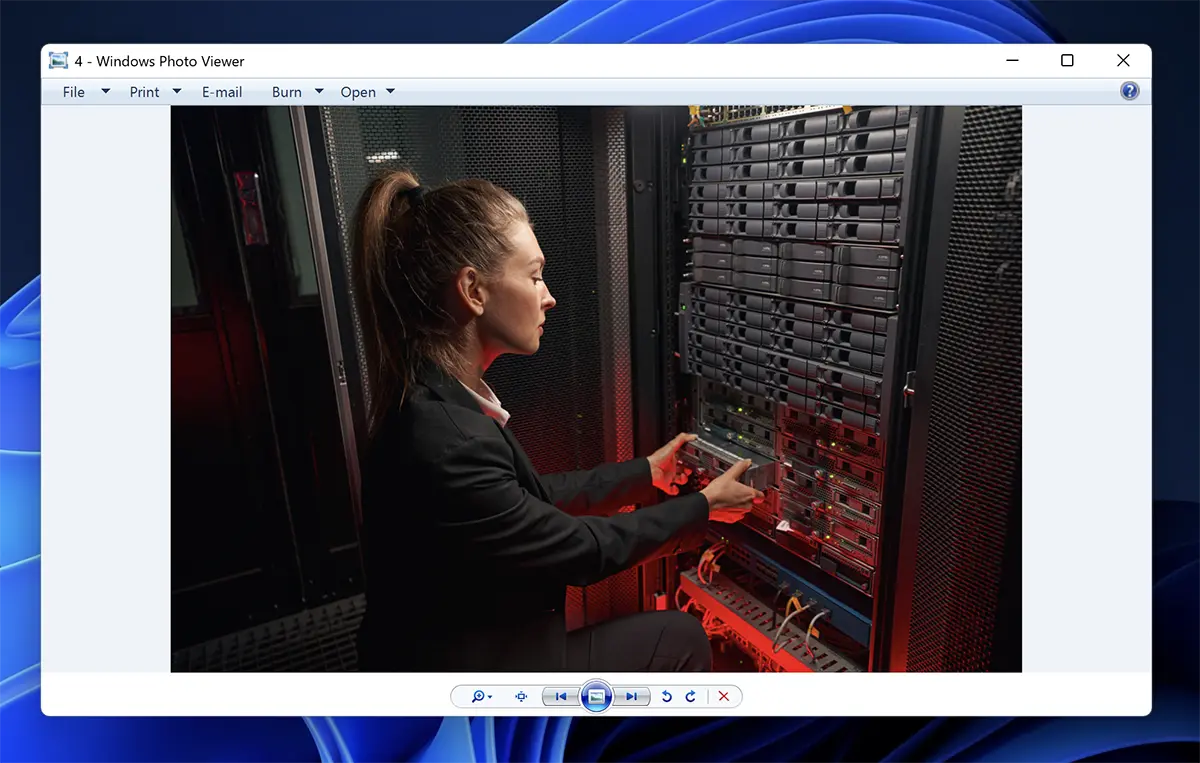
How to enable Windows Photo Viewer in Windows 11.
To activate this application for viewing and editing photos in Windows 11, all you have to do is follow the steps in the tutorial below:
1. Download the archive ActivateWindows-Photo-Viewer-on-Windows-10.zip. This archive contains a file .reg whose content is as follows:
Windows Registry Editor Version 5.00

[HKEY_CLASSES_ROOT\Applications\photoviewer.dll]

[HKEY_CLASSES_ROOT\Applications\photoviewer.dll\shell]

[HKEY_CLASSES_ROOT\Applications\photoviewer.dll\shell\open]
"MuiVerb"="@photoviewer.dll,-3043"

[HKEY_CLASSES_ROOT\Applications\photoviewer.dll\shell\open\command]
@=hex(2):25,00,53,00,79,00,73,00,74,00,65,00,6d,00,52,00,6f,00,6f,00,74,00,25,\
00,5c,00,53,00,79,00,73,00,74,00,65,00,6d,00,33,00,32,00,5c,00,72,00,75,00,\
6e,00,64,00,6c,00,6c,00,33,00,32,00,2e,00,65,00,78,00,65,00,20,00,22,00,25,\
00,50,00,72,00,6f,00,67,00,72,00,61,00,6d,00,46,00,69,00,6c,00,65,00,73,00,\
25,00,5c,00,57,00,69,00,6e,00,64,00,6f,00,77,00,73,00,20,00,50,00,68,00,6f,\
00,74,00,6f,00,20,00,56,00,69,00,65,00,77,00,65,00,72,00,5c,00,50,00,68,00,\
6f,00,74,00,6f,00,56,00,69,00,65,00,77,00,65,00,72,00,2e,00,64,00,6c,00,6c,\
00,22,00,2c,00,20,00,49,00,6d,00,61,00,67,00,65,00,56,00,69,00,65,00,77,00,\
5f,00,46,00,75,00,6c,00,6c,00,73,00,63,00,72,00,65,00,65,00,6e,00,20,00,25,\
00,31,00,00,00

[HKEY_CLASSES_ROOT\Applications\photoviewer.dll\shell\open\DropTarget]
"Clsid"="{FFE2A43C-56B9-4bf5-9A79-CC6D4285608A}"

[HKEY_CLASSES_ROOT\Applications\photoviewer.dll\shell\print]

[HKEY_CLASSES_ROOT\Applications\photoviewer.dll\shell\print\command]
@=hex(2):25,00,53,00,79,00,73,00,74,00,65,00,6d,00,52,00,6f,00,6f,00,74,00,25,\
00,5c,00,53,00,79,00,73,00,74,00,65,00,6d,00,33,00,32,00,5c,00,72,00,75,00,\
6e,00,64,00,6c,00,6c,00,33,00,32,00,2e,00,65,00,78,00,65,00,20,00,22,00,25,\
00,50,00,72,00,6f,00,67,00,72,00,61,00,6d,00,46,00,69,00,6c,00,65,00,73,00,\
25,00,5c,00,57,00,69,00,6e,00,64,00,6f,00,77,00,73,00,20,00,50,00,68,00,6f,\
00,74,00,6f,00,20,00,56,00,69,00,65,00,77,00,65,00,72,00,5c,00,50,00,68,00,\
6f,00,74,00,6f,00,56,00,69,00,65,00,77,00,65,00,72,00,2e,00,64,00,6c,00,6c,\
00,22,00,2c,00,20,00,49,00,6d,00,61,00,67,00,65,00,56,00,69,00,65,00,77,00,\
5f,00,46,00,75,00,6c,00,6c,00,73,00,63,00,72,00,65,00,65,00,6e,00,20,00,25,\
00,31,00,00,00

[HKEY_CLASSES_ROOT\Applications\photoviewer.dll\shell\print\DropTarget]
"Clsid"="{60fd46de-f830-4894-a628-6fa81bc0190d}"
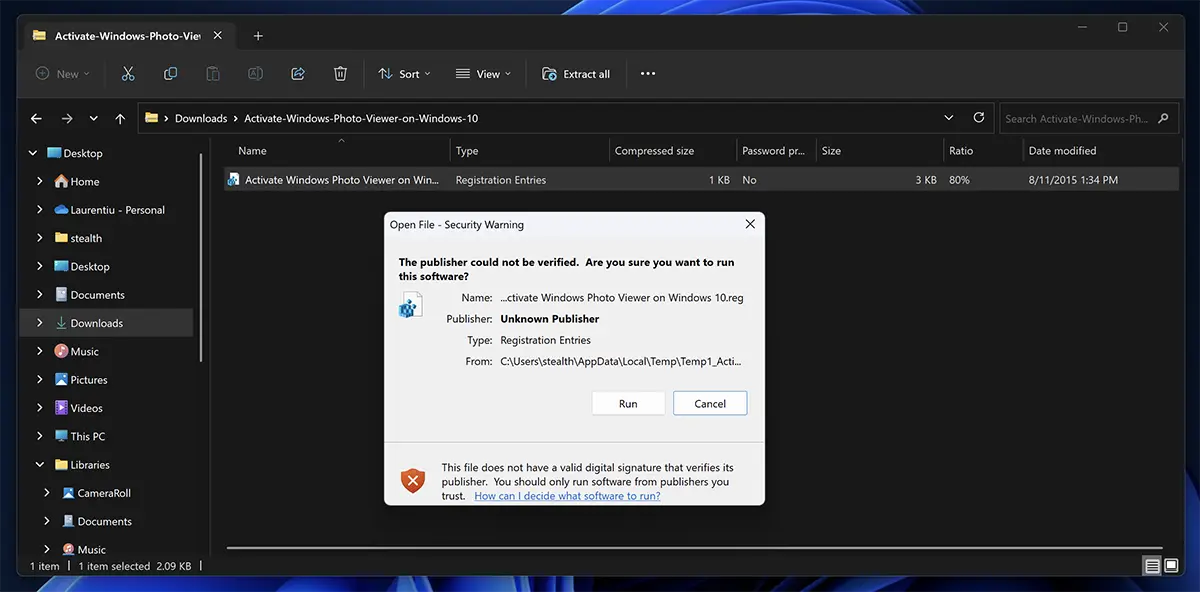
2. Double click on the file "Activate Windows Photo Viewer on Windows 10.reg”, then click on “Run” in the dialog box that warns you that this file does not have a valid digital signature.
3. Click "Yes"in the dialog box"User Account Control".
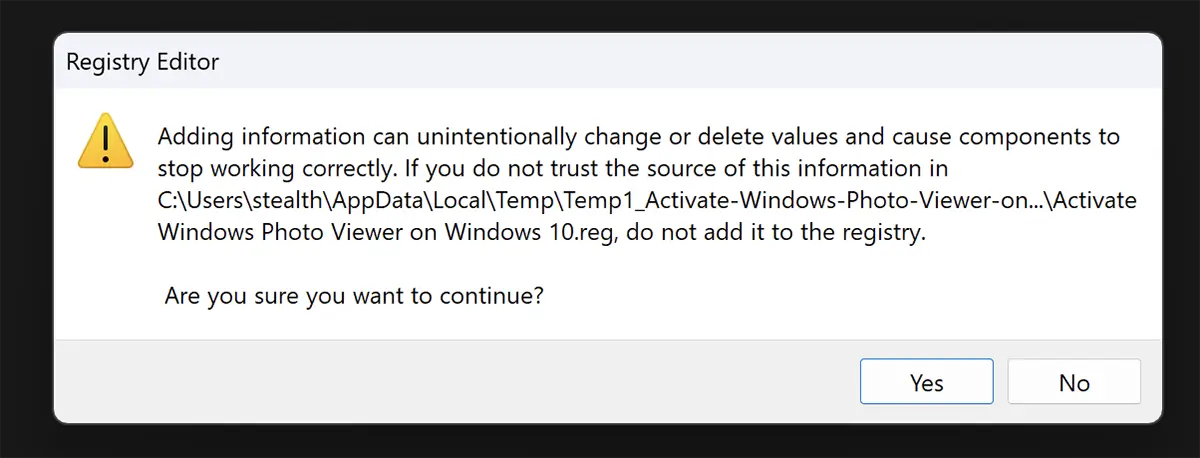
4. Click "Yes", Then click"Ok” in the dialog boxes of Registry Editor.
After this step, you will be able to open photos with Windows Photo Viewer in Windows 11.
How do you set Windows Photo Viewer application default for images in Windows 11
Next, if you double-click on an image, it will also open with the application "Photos". As you set Windows Photo Viewer as the default application for photos follow the steps below:
1. Right-click on a photo, then from the menu that opens, go to "Open with”>“Choose another app".
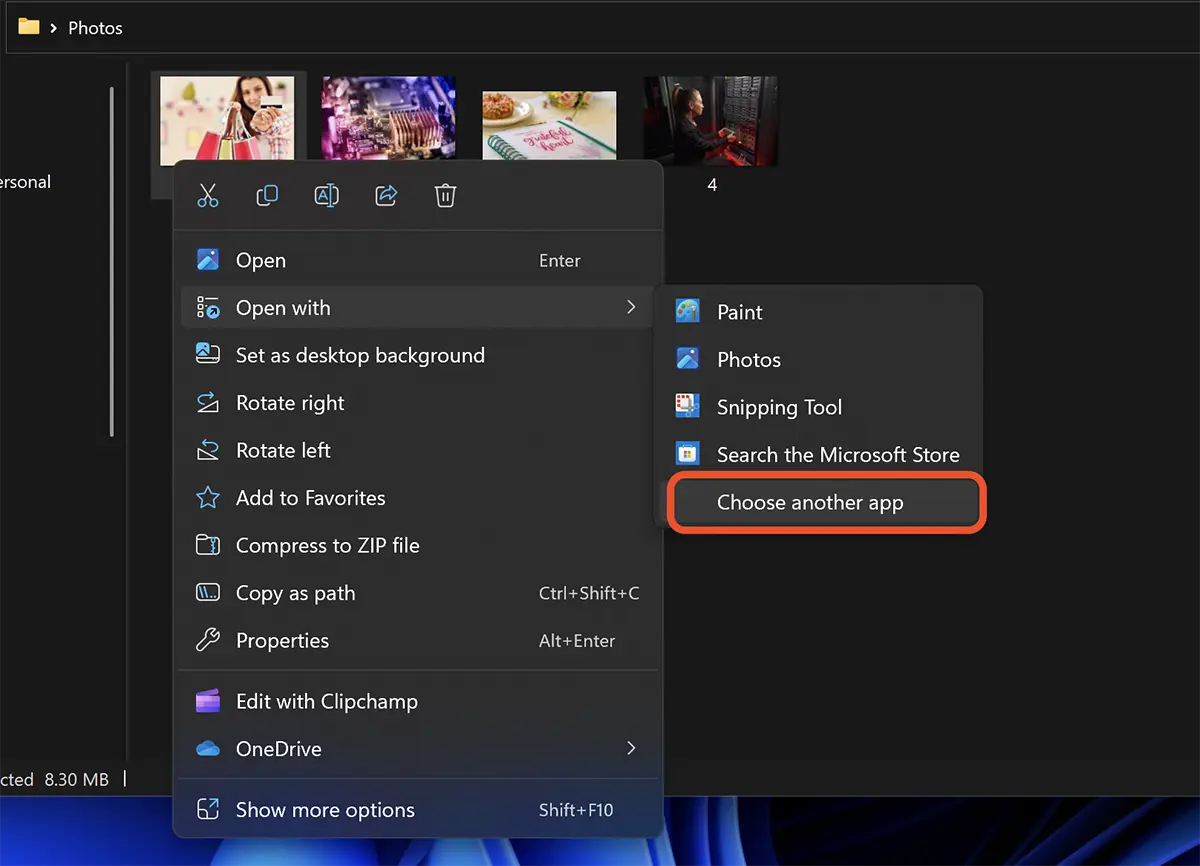
2. From the list that opens, select "Windows Photo Viewer", Then click on the button"Always".
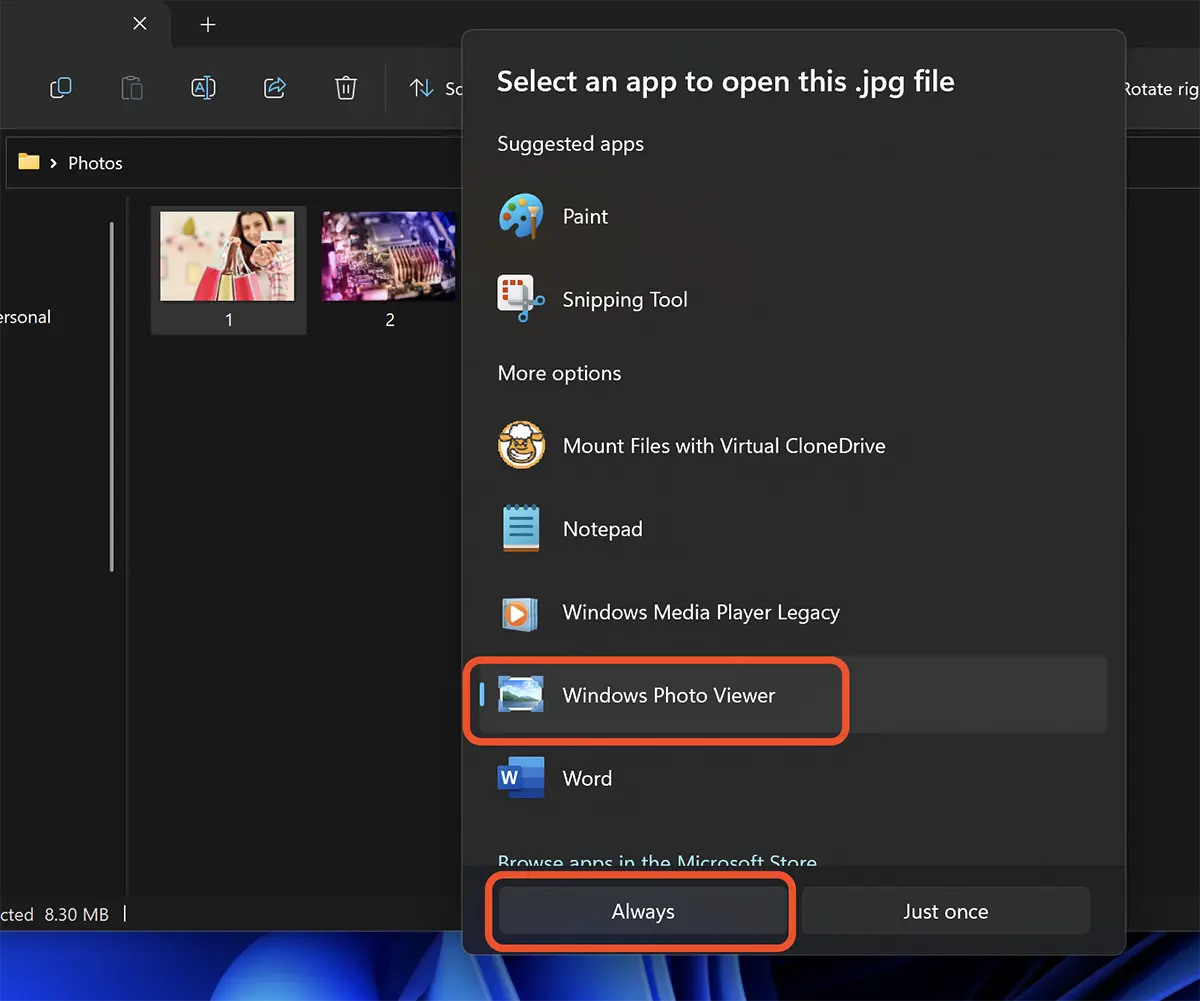
After this step, when you double-click on a picture, it will automatically open with Windows Photo Viewer.
application Windows Photo Viewer offers you a series of options that allow you to view and manage images and photos on your computer.
Opening and viewing images – you can open and view individual images and photos or in a presentation mode.
Resizing images – you can resize the images to the desired size.
Rotating images – you can rotate the images in different directions.
Zoom - you can zoom in the image to see details better.
Print – you can print images from your computer directly from Windows Photo Viewer.
Share – you can share images by e-mail or through social networks.
The tutorial above has been tested on the latest version of Windows 11, Windows 11 Insider Preview 25352.1 (zn_release).